How to temporarily disable an account on Windows 10
When you need to block someone from using a shared computer, you can just disable their account on Windows 10 — Here are two ways to do it.

On Windows 10, you can add multiple accounts to share a device with other people — that way everyone can have a personal and custom space with their own desktop, browser bookmarks, and separate files.
When an account is no longer needed, using the Settings app is also super-easy to delete a user along with their settings and files, but if you only need to block someone temporarily, you won't find an option to simply disable an account. However, it doesn't mean that you need to lock the door or delete the account just to temporarily prevent someone from accessing the device, as it's still possible to use Computer management and Command Prompt to disable an account.
In this Windows 10 guide, we'll walk you through the steps to disable a user account when you're sharing your PC with multiple users, and you're planning to restate access in the future.
- How to disable a Windows 10 account using Computer Management
- How to disable a Windows 10 account using Command Prompt
How to disable a Windows 10 account using Computer Management
On Windows 10 Pro or Enterprise, you can use Computer Management to manage various aspects of an account, including the ability to restrict access to an account.
- Open Start.
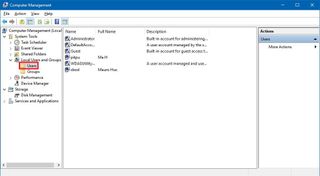
- Search for Computer Management and click the top result to open the console.Quick tip: You can also use the Windows key + X keyboard shortcut and selecting Computer Management.
- Browse the following path:
System Tools > Local Users and Groups > Users

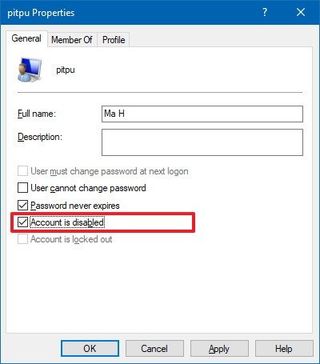
- Double-click the account you want to disable. (If the user account is using a Microsoft account, note that the name will only use the first five letters of the email address. If you want the account to use a custom name, you can refer to this guide.)
- Under the "General" tab, check the Account is disabled option.

- Click Apply.
- Click OK.
Once you've completed the steps, the account will no longer be accessible, nor it'll appear as an available account on the sign-in screen.
If you want to revert the changes to enable the account again, simply follow the same instructions, but on step No. 5, make sure to clear the Account is disabled option.
How to disable a Windows 10 account using Command Prompt
If you feel more comfortable using commands, or your device is running Windows 10 Home, you can use Command Prompt to disable or enable a Windows 10 account.
Get the Windows Central Newsletter
All the latest news, reviews, and guides for Windows and Xbox diehards.
- Open Start.
- Search for Command Prompt.
- Right-click the result and select Run as administrator.
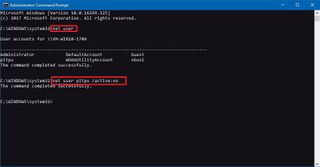
- Type the following command to list all the available accounts added on your computer and press Enter:
net user - Type the following command to disable the account and press Enter:
net user username /active:noIn the above command replace username with the name of the account you want to restrict access.

After completing the steps, the account you've disabled will no longer be accessible and it'll not be listed on the sign-in screen.
At any time you can enable the Windows 10 account again using the same instructions, but on step No. 5, use the
net user username /activate:yescommand.
While we're focusing this guide on Windows 10, you can also use the same instructions to disable or enable an account on Windows 8.1 and Windows 7.
More Windows 10 resources
For more helpful articles, coverage, and answers to common questions about Windows 10, visit the following resources:
- Windows 10 on Windows Central – All you need to know
- Windows 10 help, tips, and tricks
- Windows 10 forums on Windows Central
Mauro Huculak is technical writer for WindowsCentral.com. His primary focus is to write comprehensive how-tos to help users get the most out of Windows 10 and its many related technologies. He has an IT background with professional certifications from Microsoft, Cisco, and CompTIA, and he's a recognized member of the Microsoft MVP community.

