How to enable NTFS support to treat folders as case sensitive on Windows 10
Windows 10 now handles case sensitive files, just like Linux, and here are the steps to enable the features.

Although you can now run a number of Linux distros natively on Windows 10, this integration has been a little tricky when it comes to handling filename case, as Linux is case sensitive and Windows is not.
In order to overcome this limitation, starting with the Windows 10 April 2018 Update (version 1803), NTFS includes a new flag that you can enable on a per-folder basis allowing the file system to treat files and folders as case sensitive.
Using this new flag, you can not only handle case sensitive files while using a Linux console but more importantly, it also allows Windows applications (such as Word and Notepad) to open files correctly if they're only different by case.
In this Windows 10 guide, we'll walk you through the easy steps to enable or disable support for case sensitivity at the folder level with a command option available after upgrading to the April 2018 Update.
- How to enable case sensitivity support on Windows 10
- How to disable case sensitivity support on Windows 10
How to enable case sensitivity support on Windows 10
Starting with Windows 10 version 1803, you can enable case sensitivity at the folder level using these steps:
- Open Start.
- Search for Command Prompt, right-click the top result, and select Run as administrator.
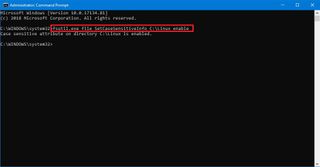
- Type the following command to enable NTFS to treat the folder's content as case sensitive and press Enter:
fsutil.exe file SetCaseSensitiveInfo C:\folder\path enableIn the command, remember to include the path to the folder you want to enable case sensitivity.

After completing the steps, inside the folder, you can now read and create files and folders using the same name but different case, and NTFS will treat them as entirely different files.
If you need to handle files with case-sensitive names on multiple folder locations, you'll need to repeat the same steps on the remaining folders, as you can't enable the new file system feature globally.
Get the Windows Central Newsletter
All the latest news, reviews, and guides for Windows and Xbox diehards.
How to disable case sensitivity support on Windows 10
If you no longer need this feature on a particular folder, you must first rename the files and folders using unique names, move the content to another folder with case sensitivity enabled, or delete the folder's content, and then follow these steps:
- Open Start.
- Search for Command Prompt, right-click the top result, and select Run as administrator.
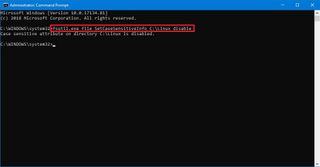
- Type the following command to disable NTFS to treat the folder's content as case sensitive and press Enter:
fsutil.exe file SetCaseSensitiveInfo C:\folder\path disableIn the command, remember to include the path to the folder you want to enable case sensitivity.

Once you've completed the steps, NTFS will no longer recognize content with same names with a different case as unique files.
More Windows 10 resources
For more helpful articles, coverage, and answers to common questions about Windows 10, visit the following resources:
- Windows 10 on Windows Central – All you need to know
- Windows 10 help, tips, and tricks
- Windows 10 forums on Windows Central
Mauro Huculak is technical writer for WindowsCentral.com. His primary focus is to write comprehensive how-tos to help users get the most out of Windows 10 and its many related technologies. He has an IT background with professional certifications from Microsoft, Cisco, and CompTIA, and he's a recognized member of the Microsoft MVP community.

